How to Set Up an MCP Server: A Beginner's Guide
Learn how to create and configure your own Model Context Protocol server to extend AI capabilities
Table of Contents
How to Set Up an MCP Server: A Beginner's Guide
Introduction to MCP
Model Context Protocol (MCP) is an open standard (introduced by Anthropic in 2024) that defines how AI assistants (like large language models) can connect to external data sources and tools. Think of MCP as a kind of "USB-C port for AI applications" – it provides one standardized interface for an AI model to plug into many different systems.
In practical terms, MCP allows AI models (the clients) to query databases, call APIs, read files, or execute functions on your computer through servers that implement this protocol. This means you don't need to write custom integrations for each tool or data source; instead, both AI apps and tools just speak MCP, reducing integration complexity.
MCP's purpose is to extend an AI's capabilities beyond what it was trained on. An AI assistant can retrieve up-to-date information or perform actions in real time via MCP servers. For example, an MCP server could let an AI fetch live weather data, access a business database, or control an application like Blender.
Developers benefit by writing a connector once and reusing it across different AI models or platforms (no more one-off, ad-hoc API wrappers). Overall, MCP creates a flexible client–server architecture for AI: the AI app (client/host) connects via a transport layer (like a local pipe or network port) to one or more external MCP servers that provide specialized functions.
Each server focuses on a specific capability (e.g. a "weather" server, a "database" server), and the AI can use them as needed during a conversation.
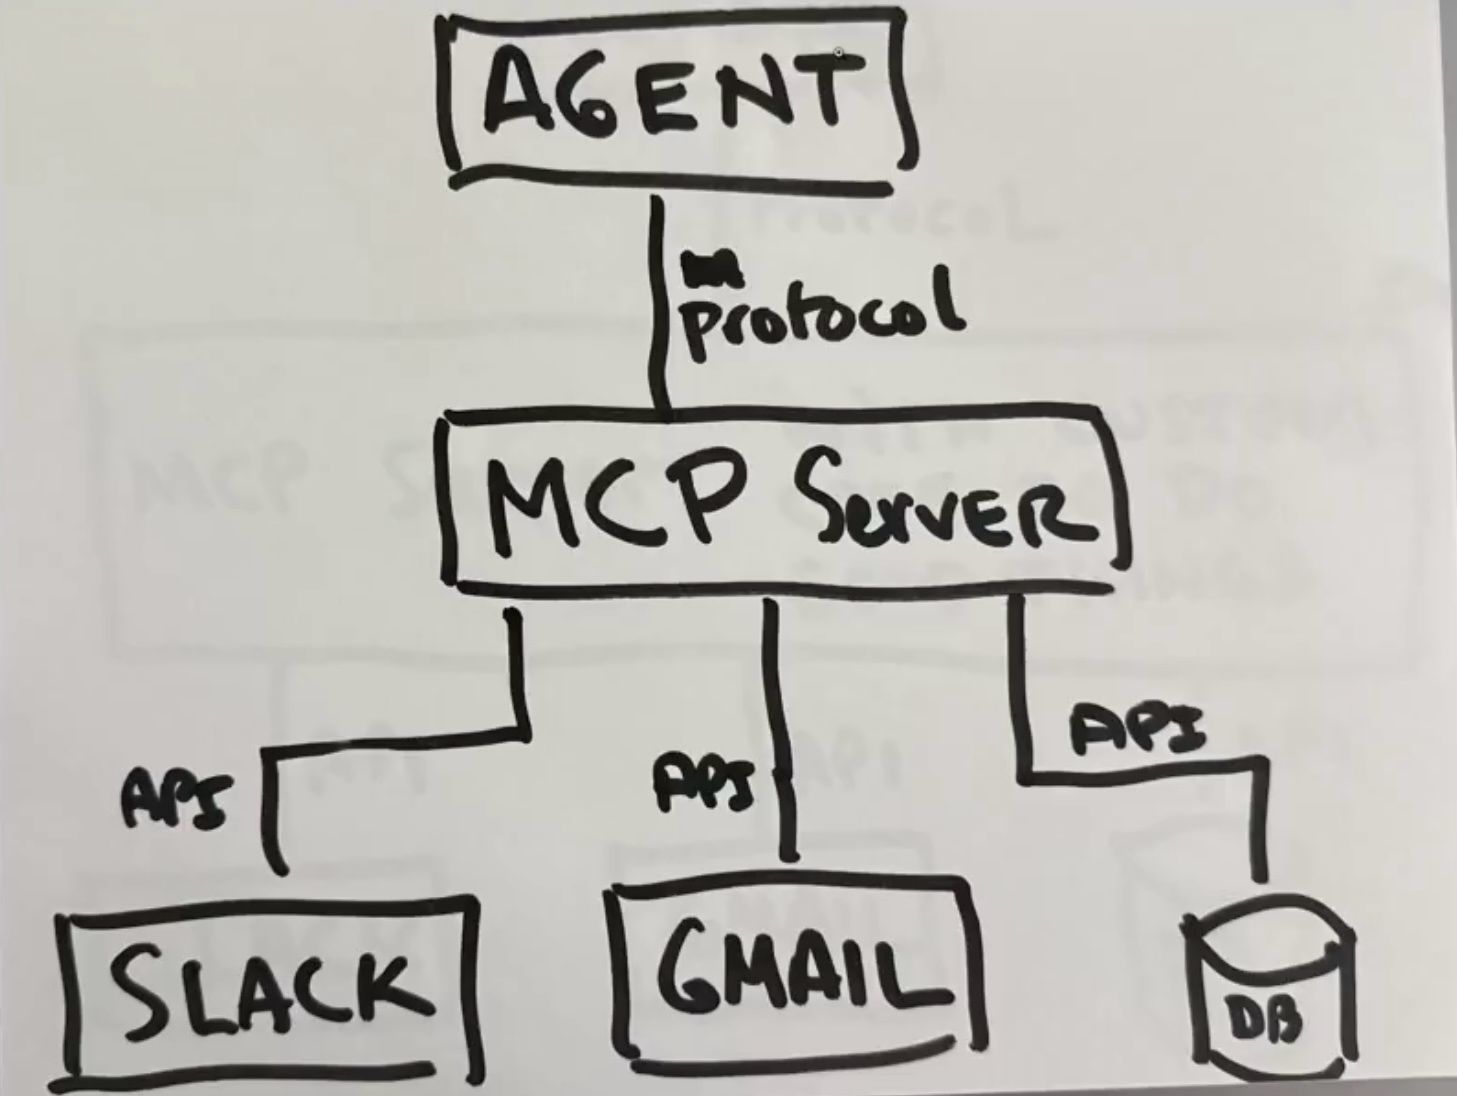
Diagram: An AI Host (e.g., Claude Desktop) contains an MCP Client that communicates with external MCP Server processes via a transport layer. This standardized setup allows the host to connect to multiple servers, each providing different tools or resources to the AI.
Prerequisites
Before setting up an MCP server, ensure you have the following ready:
- Hardware/OS: A computer running Windows, macOS, or Linux with an internet connection (for downloading packages). MCP servers are lightweight and can run on typical development machines.
- Python Environment: Python 3.10 or higher installed. Python will be used to write and run the MCP server in this guide. (Ensure you have pip available as well.)
- Node.js (Optional): Node.js is recommended if you plan to use the MCP Inspector tool for testing, since the inspector's UI requires Node to run. This is optional but useful for debugging.
- AI Client (Optional for testing): Ideally, have an MCP-compatible AI client to connect to your server. The most common is Claude Desktop (Anthropic's Claude AI desktop app) which supports MCP out-of-the-box. Having Claude Desktop installed (latest version) is helpful for live testing, though it's not strictly required if you use the inspector or a CLI tool.
- Basic Knowledge: Familiarity with Python basics (installing packages, running scripts) and a general idea of how LLMs can use tools will help. You do not need to be an expert in AI – just know how to run commands in a terminal and edit code.
Step-by-Step Installation
Setting up an MCP server involves preparing your environment, installing the MCP SDK, and creating the server code. Below is a step-by-step process:
-
Install Required Software: Make sure Python 3.10+ is installed. If not, download it from the official site and install it (ensure that the python/python3 command works in your terminal). If you plan to use the MCP Inspector for testing, also install Node.js from its website. Optionally, install Claude Desktop at this stage if you intend to use it for testing the server.
-
Set Up a Project Directory: Choose a location for your MCP server project and create a new folder. For example, open a terminal/PowerShell and run:
# Create a new project directory (e.g., "my_mcp_server") and enter it
mkdir my_mcp_server
cd my_mcp_server
It's good practice to use a virtual environment for Python to isolate your project's dependencies. We will use a tool called uv (a Python project manager provided by the MCP SDK) to simplify setup. First, install uv:
- On macOS/Linux: run
curl -LsSf https://astral.sh/uv/install.sh | shin your terminal. - On Windows: run the following in PowerShell (as an administrator if needed):
powershell -ExecutionPolicy Bypass -Command "iwr https://astral.sh/uv/install.ps1 -UseBasicParsing | iex"
This downloads and installs the uv tool. After installing uv, restart your terminal so the uv command becomes available.
- Initialize the Python Environment: Now use uv to initialize your project and set up a virtual environment for it:
# Initialize a new MCP project (creates a basic project structure)
uv init my_mcp_server
cd my_mcp_server

# Create and activate a virtual environment for the project
uv venv
# If you're on Mac/Linux:
source .venv/bin/activate
# If you're on Windows (PowerShell):
.venv\Scripts\activate
The above ensures that any Python packages we install for this project don't conflict with other projects on your system.
- Install MCP SDK and Dependencies: With the virtual environment active, install the MCP server SDK. Using uv, you can add the MCP package (and any other needed libraries) with one command. For example:
uv add "mcp[cli]" httpx
This command uses uv to install the MCP Python SDK (including CLI tools by specifying mcp[cli]) and the HTTPX library (useful for making HTTP requests in your server). You can include other dependencies similarly, or omit httpx if you don't need it. Under the hood, this runs pip to fetch the packages and records them for your project.
- Create the MCP Server Script: Next, create a Python file that will contain your server code. For instance, create a file named server.py in your project directory (with uv, you can do uv touch server.py, or use your text editor to create the file). Open this file in a code editor.
Now, add a simple MCP server implementation. For a beginner-friendly example, we'll create a server that provides two simple capabilities: a tool that adds two numbers, and a resource that returns a greeting message. Copy the following code into server.py:
from mcp.server.fastmcp import FastMCP

# Initialize the MCP server with a name
mcp = FastMCP("DemoServer")

# Define a simple tool that adds two numbers
@mcp.tool()
def add(a: int, b: int) -> int:
    """Add two numbers."""
    return a + b

# Define a resource that returns a greeting string
@mcp.resource("greeting://{name}")
def get_greeting(name: str) -> str:
    """Return a greeting message."""
    return f"Hello, {name}!"

# Run the server when this script is executed
if __name__ == "__main__":
    mcp.run(transport="stdio")
Let's break down what this does:
- We import FastMCP from the SDK and create an MCP server instance named "DemoServer".
- We then define a tool function add(a, b) which simply returns the sum of two numbers.
- The @mcp.tool() decorator exposes this function to the MCP protocol, meaning the AI can call add via our server.
- We also define a resource with a URI pattern "greeting://{name}". The get_greeting(name) function returns a friendly greeting for the provided name.
- The @mcp.resource(...) decorator makes it available as a read-only resource that an AI client can load into context.
- Finally, the mcp.run(transport="stdio") call starts the server (using the standard input/output transport) when we run the script.
At this point, the code for our MCP server is complete!
- Verify Installation: To ensure everything is set up correctly, you can do a quick test run. In the terminal, run:
uv run server.py
This will launch the server. Since our server uses the default STDIO transport, it will start and then wait for a client connection (it may not print much to the console). If you see no errors, the server started successfully. You can stop it for now with Ctrl+C. We will properly test it with a client in the next section.
Configuration
Now that your MCP server is built, there are a few configuration considerations to optimize performance and ensure compatibility with clients:
Server Name: The name you gave to FastMCP (in our example, "DemoServer") is important. This name is how clients will identify your server. Ensure it's unique and descriptive of the server's purpose. For instance, if you're building a weather info server, you might name it "WeatherServer". When configuring a client like Claude Desktop, you will refer to this name in the config file. (If you change the name in code, update it in any client configurations as well.)
MCP SDK Version: Make sure you are using a compatible version of the MCP SDK. The MCP ecosystem is evolving; using the latest stable version helps with compatibility. (For example, some features require MCP SDK v1.2.0+.) If you used uv add "mcp[cli]" as above, you likely have a recent version. It's a good idea to update (uv upgrade or pip install --upgrade mcp) periodically to get improvements and bug fixes.
Transport Choice: By default, our server runs with transport="stdio". STDIO is the simplest transport and works for connecting a local AI host (Claude Desktop uses this mode for launching local servers). For most beginners, you don't need to change this – it's optimal for running the server on the same machine as the client. In advanced scenarios (e.g., running the server on a different machine or as a persistent service), MCP also supports other transports like WebSockets or SSE (Server-Sent Events), but those require additional setup. Stick to STDIO for local use, as it has the least overhead and is very compatible with desktop clients.
Dependencies and Environment Variables: If your server needs configuration values (like API keys, database URLs, etc.), avoid hardcoding them. Instead, use environment variables or a config file. For example, you might set an environment variable WEATHER_API_KEY on your system and have your server code load it via os.environ. Do not embed secrets like API keys in your code – this is a security risk. Using a separate .env file or a secrets manager is a best practice. You can load environment variables in Python using packages like python-dotenv or simply through the OS environment. This keeps sensitive info out of your source code.
Performance Tuning: Out-of-the-box, an MCP server will handle most tasks sequentially. If your server will perform long-running operations or heavy computations, consider using asynchronous functions or threading to keep it responsive. The MCP Python SDK supports async tools (just define your function with async def and use await for I/O) which can be helpful for tasks like calling external APIs without blocking other requests. Also, if your server frequently fetches data that doesn't change often, implement caching. For example, you could cache results in memory or on disk to avoid redundant work. This will improve responsiveness and reduce load on external services (as well as avoid hitting rate limits). Example: In a weather server, you might cache the last fetched forecast for a location for a few minutes instead of calling the API every single time.
Compatibility and Testing: It's wise to test your server with the intended client early. Each client (Claude, other chat apps, IDE plugins, etc.) may have slight differences in how they discover and authorize tools. Our upcoming Testing section will guide you through integrating with Claude Desktop. Generally, ensure the client can start the server and list its tools without errors. Keeping function docstrings and type hints in your code will also help the AI understand what each tool does, improving compatibility with the AI's reasoning (the MCP SDK uses these to inform the AI about the tool).
In summary, configure your server for clarity (naming and documentation), security (no secrets in code), and efficiency (appropriate use of async or caching). With these configurations in place, you're ready to run the server and connect it to an AI client.
Testing and Running the Server
With installation complete, it's time to run your MCP server and verify that it works correctly. We'll cover two approaches: using the MCP Inspector for quick testing, and integrating with Claude for Desktop as an example of a real AI client.
- Run in Development Mode (Using MCP Inspector): During development, the MCP Python SDK provides a handy tool called the Inspector that simulates an AI client and gives you a web interface to test your server. To use it, make sure you have Node.js installed (as mentioned earlier). Then, in your project directory, run:
mcp dev server.py
This command will launch your server.py in a special mode and automatically open a browser window for the MCP Inspector. In the Inspector UI (often at localhost:5173), you'll see tabs for Resources, Prompts, Requests, Tools, etc. Your server's tools and resources should be listed there. For example, you can click on a tool (like add) and provide sample inputs to execute it, or list a resource like greeting://Alice. The Inspector will show the request being sent and the response from your server, allowing you to verify everything is working. This is a great way to debug issues in a friendly interface. (If the Inspector doesn't launch or you see an error, double-check that Node is installed and that the mcp CLI was installed with the mcp[cli] package. You can also start the inspector manually by opening a browser to the given localhost port if needed.)
- Run the Server for a Client (Production mode): Once you're satisfied that the server functions correctly, you can run it in a normal mode to serve an AI client. If you used
mcp.run()in your code (as we did withif __name__ == "__main__": mcp.run(...)), you can simply execute the script. For example:
uv run server.py
or equivalently python server.py (ensuring your virtual environment is activated). The server will start and idle, waiting for a connection via the specified transport (stdio by default). Running it this way doesn't show a GUI, but in the background it's ready to handle requests.
- Connect the Server to Claude Desktop: To test the server in a real AI conversation, we'll integrate it with Claude (for Desktop). Claude Desktop acts as an MCP host, and we need to register our server in its configuration so that Claude knows it exists.
-
Locate Claude's Config File: Claude Desktop uses a JSON config file to configure MCP servers. On macOS the file is at
~/Library/Application Support/Claude/claude_desktop_config.json; on Windows, it's in your AppData folder, e.g.%APPDATA%\Claude\claude_desktop_config.json(which typically expands toC:\Users\<YourName>\AppData\Roaming\Claude\claude_desktop_config.json). If this file does not exist yet, you can create it. (Tip: In Claude Desktop, there is also a Settings > Developer tab that allows you to open the config file location directly.) -
Edit the Config File: Open the config JSON in a text editor. You'll need to add an entry telling Claude how to launch your MCP server. Add an "mcpServers" section if it isn't there. For our example, we might add something like this inside the top-level JSON object:
{
  "mcpServers": {
    "DemoServer": {
      "command": "uv",
      "args": [
        "--directory", "C:/full/path/to/my_mcp_server",
        "run", "server.py"
      ]
    }
  }
}
This configuration block does the following: it registers a server named "DemoServer" (this string should match the name you used in FastMCP(...) exactly). It also tells Claude how to start the server – here we use the uv command. The args array provides the arguments to uv: we point it to the project directory and instruct it to run server.py. Using uv ensures the server runs with the correct virtual environment and dependencies. (If you prefer not to use uv here, you could set "command": "python" and "args": ["C:/path/to/server.py"], but then you must ensure that the mcp package is installed in the Python that Claude will use. The uv approach is convenient for development.)
Make sure to replace the path with the actual absolute path to your project directory. On macOS, use Unix-style paths (e.g., "/Users/
-
Save and Restart Claude: After editing the config, save the JSON file and then completely restart the Claude Desktop app (close it and re-open it). Claude Desktop will read this config on startup to launch your MCP server. (If Claude was already open, it won't notice the change until a restart.) Once restarted, the app should spawn your server in the background.
-
Verify the Server is Detected: In Claude's chat interface, look for the MCP tools indicator. Claude for Desktop shows a small hammer 🔨 icon (usually in the top or side of the chat window) when MCP tools are available. Click this hammer icon – you should see a list of tools corresponding to your server (for our example, you'd see add and any other tools you defined). If you see them, congratulations – Claude has successfully connected to your MCP server! You can now use these tools in conversation.
If your server does not show up in Claude's UI, double-check the config file for typos. Common issues are JSON formatting errors or incorrect paths. Claude won't load the config if there's a JSON syntax mistake (like a missing comma or brace). Also verify that the name in the config matches the name in your code, and that the path to the script is correct and absolute (no ~ tilde or relative paths). After fixing any issues, restart Claude again. We'll cover more troubleshooting tips in the next section if problems persist.
- Test the Server in AI Conversation: Now comes the fun part – using the server through Claude. In Claude's chat, you can ask it to perform tasks that involve your new tools or resources. For example, with our DemoServer, you can try prompting Claude with: "Using the DemoServer, what is 2 + 3?" or simply "Add 2 and 3 using the tool."
Claude will recognize that it has the add tool available and (usually after asking your permission) will invoke that tool to get the result. In our case, Claude should output the answer "5" (with some explanation). You can also explicitly instruct it, like: "Use the add tool from DemoServer on 10 and 20." Because the MCP integration is active, Claude can call the tool and return the result within its answer.
For resources, you might try: "Load the resource greeting://Alice" or just "greeting for Alice", and Claude may fetch that resource and include the text "Hello, Alice!" in its reply. (The exact phrasing can vary; sometimes you might have to coax the AI to use a tool or resource by mentioning it.)
When a tool is called, Claude Desktop will usually pop up a small prompt asking you to allow or deny the tool's execution (this is a safety feature – the user must approve the AI using external tools). Go ahead and allow it for testing purposes. You should then see the result appear in the conversation.
- Using MCP CLI (Alternative): If you don't have Claude Desktop, another way to test basic usage is via the command-line. The MCP CLI that comes with the SDK (mcp command) has an interactive mode and even a way to simulate a client request. For instance, you could run
mcp install server.pyto register your server for a local test, or usemcp clientcommands to manually call a tool. However, for beginners, using the Inspector or Claude is more straightforward, so we won't go deep into CLI usage here.
At this point, your MCP server should be up and running, and you should have confirmed that it works either through the inspector or via Claude's interface. You've effectively extended an AI's abilities with custom code – great job!
Basic Usage
After setup, interacting with the MCP server is meant to be intuitive. Here are the basics of how you can use your MCP server in everyday AI assistant usage:
Invoking Tools in Conversation: When chatting with your AI (Claude, in our example), you typically just ask for what you want, and the AI will decide to use a tool if it's relevant. For instance, if you have a weather server with a tool get_forecast(city), you can ask "What's the weather in London?" The AI will realize it has an available tool to get live weather data and may say something like, "Let me check the weather for London," then call your tool behind the scenes. You will see a prompt to allow the tool, and once allowed, Claude will execute get_forecast via the MCP server and then incorporate the result into its answer. In essence, you, as the user, describe the task, and the AI + MCP server handle the rest. This makes interactions very natural – you don't necessarily have to command the tool explicitly every time (though you can, as shown below).
Explicit Tool Use: You can also explicitly tell the AI to use a specific tool/resource. This might be necessary if the AI doesn't automatically realize it should use one. For example: "Use the DemoServer add tool to add 15 and 7." Claude will then definitely reach for the add function. Likewise, "Load the resource greeting://Bob" would prompt it to retrieve that resource (which our server would return as "Hello, Bob!"). Explicit invocation can be helpful when you have multiple servers or want to be sure the AI uses a particular method.
Understanding Prompts: If your server provides prompt templates (via @mcp.prompt), these won't be directly called by the AI like tools, but rather offered as suggestions or used under the hood to guide the AI. For example, a prompt might be a template for a code review. In the UI, these might appear as options you can inject into the conversation or the AI might request them when needed. As a beginner, you might not use prompts immediately, but know that they are essentially preset pieces of text the AI can pull in to maintain consistency for specific tasks.
User Approval and Trust: Each time a tool is invoked, the client will ask for your approval (as noted earlier). This is a safety mechanism. Make sure you trust the server's function before approving. For instance, approving a tool that reads your file system will give it access to your files. In our simple add/greeting example, the tools are harmless. Always consider what a tool is doing before approving its use.
Multi-Modal Interactions: Some advanced MCP servers might handle more complex outputs (like images, audio, etc.). For example, an MCP server could return an image (the client UI might then display it). Basic usage remains the same – you ask for something, the AI calls the tool, and the result (image, text, etc.) is shown to you. Keep in mind Claude Desktop (at the time of writing) is primarily text-based, so most MCP interactions will yield text or file content as output.
Switching Servers: If you have multiple MCP servers configured, Claude can use all of them. In the Claude UI, the hammer icon menu will list tools from all configured servers. You can enable/disable servers by editing the config or (in some clients) toggling them. If you ever only want the AI to use one server and not another, you might need to adjust the config or instruct the AI accordingly in your prompt.
In short, once the server is set up, using it is as simple as asking the AI to do something that the server can help with. The heavy lifting of tool execution is handled via MCP. This design lets you focus on the what (your request) and not the how (which API to call) – the AI figures out the how by leveraging the MCP server. With practice, you'll get a feel for phrasing requests to nudge the AI toward using a tool when appropriate.
Troubleshooting
Setting up new technology can come with hiccups. Here are some common issues beginners might face with MCP server setup and how to resolve them:
Claude Desktop doesn't detect the server: If you don't see the hammer icon or your tools in Claude's UI, the config might not be loaded correctly. Double-check your claude_desktop_config.json:
- Ensure the JSON syntax is correct (no trailing commas or missing braces).
- Verify the path to your server script is an absolute path and is correct. On Windows, backslashes should be escaped or use forward slashes. On macOS/Linux, the ~ home shortcut should be expanded to the full path.
- Confirm the "command" and "args" are correct. If using uv, you might need to include the full path to the uv executable if Claude can't find it. (
which uvon Mac/Linux orwhere uvon Windows can tell you the path.) Put that full path in the config if needed. - After any change, restart Claude Desktop completely. The app only reads the config on startup.
MCP server crashes or exits immediately: When you run uv run server.py (or Claude launches it), and it crashes, look at the error message in the terminal (if you ran it manually). Typical issues could be missing modules (if so, install the required package or check your virtual env activation) or syntax errors in code (Python will point out the line). Fix any Python errors and try running again. If the server exits with no messages when launched via Claude, check the log files for clues.
Finding Logs: Claude Desktop writes logs that can help debug issues. On macOS, check ~/Library/Logs/Claude/ for files. Specifically, mcp.log contains general MCP connection info and errors, and mcp-server-<YourServerName>.log will contain any output or error trace from your server process. Open those logs in a text editor to see if there are error messages (e.g., stack traces if your code threw an exception). On Windows, the logs should be in %APPDATA%\Claude\Logs\ or a similar directory (you can search for mcp.log in your user folder). Reading these logs often pinpoints configuration mistakes or runtime errors in the server code.
uv or mcp command not found: If after installation, your terminal says uv: command not found (or on Windows, 'uv' is not recognized), it likely means the uv tool wasn't added to your PATH. Ensure you ran the install script and restarted the terminal. If it still doesn't work, you can install uv via pip as a fallback (pip install uv – though the script should have done this). Similarly, if mcp command isn't found, make sure you installed the MCP SDK with the CLI extras. Running uv add "mcp[cli]" or pip install mcp[cli] is needed for the CLI tool.
Inspector not opening or connecting: If mcp dev server.py doesn't open a browser, you can manually visit localhost:5173 after running the command. If it fails to connect, check the terminal where you ran mcp dev – if it complains about Node or something not found, you may need to install Node.js. If the inspector opens but shows no tools/resources, it means the server part might not have started. Look at the terminal for errors (it will show Python exceptions if any). Fix any errors in your server code and try again. Also, ensure you run mcp dev from the project directory so it finds server.py.
Tool calls failing silently in Claude: If Claude acknowledges a request but nothing happens, or it says it attempted to use a tool but got no response, a few things could be wrong:
- Check Claude's chat for any system message – sometimes it might say a tool was denied or failed. Make sure you allowed the tool execution when prompted.
- Then, check the Claude logs (mcp.log and server log as mentioned above) for errors. The logs may show that Claude tried to call the tool but the server threw an exception. Common mistakes are not handling a certain input in your tool, or perhaps forgetting to run the server in the right directory (so it can't find a file, etc.). Use the logs and even print statements in your code to debug.
- If the server didn't actually run, Claude might have been unable to start it. In that case, try launching the server manually (
uv run server.py) before asking Claude, as a test to see if it stays running.
"None of this is working!": If you're really stuck, don't despair. Double-check each step systematically:
- Can you run the server script manually without errors?
- Is Claude Desktop updated to the latest version (older versions may not support the newest MCP features – always update if possible)?
- Try a very simple server example (like just the add tool without any external API calls) to eliminate complexity. If that works, the issue might be with a specific dependency or code in your original server.
- Refer to the official MCP documentation's troubleshooting and debugging guides – they have additional tips for tricky scenarios.
- You can also seek help from the community (there are forums and discussion groups for MCP developers). Often others have encountered similar issues.
External API issues: If your server calls an external API (e.g., a weather API or stock data API), sometimes issues arise from those services rather than your setup. For example, you might get no data because you exceeded a rate limit or requested something invalid. In the weather tutorial, an error "Failed to retrieve grid point data" simply meant the location was outside the API's supported range. Or "No active alerts" wasn't an error – just that there were no alerts at that time. So, verify that the external service is functioning and that your requests are correct. Implementing some error handling and even retry/delay logic in your tool (e.g., pause or cache results to avoid too many rapid calls) can help. Check the API's documentation for any limits.
By methodically checking each part (your code, the config, the client logs, etc.), you can usually find the culprit. Most setup issues come down to config file typos or environment problems, which are solvable. Remember that once it's set up, you typically won't have to mess with the config often. So it's worth troubleshooting these initial bumps.
Best Practices
To wrap up, here are some best practices for using and maintaining your MCP server, especially as you move beyond the basics:
Security First: Treat your MCP server like any other service in terms of security. Only expose the functionality that's necessary. For example, if your server runs shell commands or accesses files, be very careful – you don't want an AI (or malicious prompt) to abuse a powerful tool without safeguards. Rely on the client's permission system (Claude will ask the user before running a tool), but also maybe build in checks. For instance, if you write a file-management server, consider implementing MCP's Root mechanism to restrict file access to certain directories. This prevents the server from reading parts of the filesystem it shouldn't.
Credential Management: As mentioned, don't hardcode API keys or passwords. Use environment variables or a secrets manager service to supply those to your server at runtime. This way, even if your code is shared, secrets remain safe. Also consider using short-lived tokens or limited-scope keys when possible (some services let you create read-only or time-limited keys). This minimizes risk if a key ever leaked.
Isolation: If you develop multiple MCP servers for different tasks, keep their concerns separated. For example, a server that manages personal todo lists shouldn't also hold your database credentials for an unrelated system. Isolate access – each server should only have the permissions and secrets it really needs. This way, even if one server is compromised or misused, others remain safe.
Performance and Resource Management: Monitor how your server performs, especially under heavy use:
- If your server might handle frequent requests (say, an MCP server used in an AI coding assistant that compiles code often), ensure the code is efficient. Profile your Python code if needed, use appropriate data structures, and offload heavy work to libraries (for instance, use NumPy/Pandas for number crunching to speed it up, or use caching to avoid repetition).
- Implement caching for expensive operations or API calls. For example, cache results in memory for a short time or use a simple file cache for large resources. This can dramatically improve responsiveness and avoid hitting external service limits.
- MCP servers can handle streaming responses too – if a tool needs to output a lot of data or a long-running result, consider yielding partial results (the MCP SDK supports streaming chunks). This can be advanced, but it's something to keep in mind for performance so the AI can start processing data before the tool fully completes.
- Be mindful of memory usage. If your server loads large datasets into memory (say, a huge CSV in a data analysis server), that could slow down your machine. In such cases, consider using databases or more incremental data processing.
- Test the server under realistic conditions. If it will be used intermittently during a chat, maybe everything is fine. But if the AI might call the tool in a loop or very often, ensure that scenario is handled (perhaps add a short delay or usage counter to avoid spamming an API or to prevent infinite loops).
Maintainability: Keep your server code clean and documented:
- Use docstrings for each tool/resource function to describe what it does. These descriptions are passed to the AI and help it use your tools correctly. A clear, concise description improves the AI's understanding.
- Structure your code logically. If it grows, you might split functions into multiple files or modules. The MCP server can import and use them as needed. Just ensure you still register the tools/resources with the mcp instance.
- Write tests for your server functions if possible (even simple unit tests). This way, if you change something, you can verify the core logic still works. You can use Python's unittest or pytest for this. For example, test that add(2,3) returns 5, etc. This doesn't directly test the MCP layer, but it ensures your underlying functionality is solid.
- Monitor logs when using the server. If you see exceptions or strange outputs in the logs, fix those issues to prevent future errors. Add error handling in your tools – for instance, if an API call fails, catch the exception and maybe return a friendly error message or handle it gracefully, rather than letting the exception crash the server.
- Regularly update the MCP SDK and any dependencies. New versions may improve performance or fix bugs (given how new MCP is, updates can be frequent). Just be sure to test your server after updating.
Security (continued): A few more advanced security best practices:
- No Sensitive Data Leaks: Be cautious about what your server returns. Don't inadvertently send back secrets or personal data. For example, if a tool reads a file, maybe scrub any secrets in that file before returning to the AI. Remember, the AI will see whatever the server returns, and if the conversation is shared or logged, that data could persist. So build in data sanitization if needed (e.g., remove API keys from logs or responses).
- Cleanup and Stability: If your server opens files or network connections, ensure they are closed properly after use. This prevents resource leakage. Also handle exceptions so that one error doesn't crash the entire server process. The FastMCP framework will generally keep running, but it's good practice to catch errors in your tool functions and perhaps return an error message through the protocol rather than throwing uncaught exceptions.
- Denial-of-Service (DoS) considerations: Since an AI could potentially call a tool in a loop or with huge inputs (imagine it passes a very large string to your tool or calls it 1000 times rapidly), think about adding limits. You might, for example, refuse extremely large inputs or add a short delay if calls are too frequent. This ensures the server remains responsive and your system isn't overwhelmed by an inadvertent (or malicious) barrage of requests.
Ecosystem and Community: Leverage the growing MCP community. There are many example servers available for various purposes (search the official MCP GitHub for inspiration) – you can learn from their configuration and code. If your server could be useful to others and doesn't contain private info, consider open-sourcing it. This way you can get feedback or improvements from other developers. There is a "gallery" of community-built servers, and contributing yours could help the ecosystem. At the very least, staying in touch with community forums or updates will keep you informed of best practices and new features.
Agent Behavior: When designing tools, consider how an AI will use them. Tools should be deterministic and side-effect-limited if possible. Unpredictable tools might confuse the AI. Provide clear outputs. Also, if a tool could be dangerous (e.g., deleting files), maybe you should implement an extra confirmation or safety check in the tool itself, in addition to the client's confirmation dialog. It's all about defense in depth for safety.
By following these best practices, you'll ensure your MCP server is secure, efficient, and reliable. Maintaining a well-configured server means you can depend on it during live AI interactions without unpleasant surprises. As you grow more confident, you can create more complex MCP servers, integrate multiple tools, and even set up multiple servers to expand your AI's toolkit. Happy building with MCP!